Leo’s Mane Sew Along

Showing posts with label my quilts. Show all posts

Wednesday, 4 February 2015

First finish of the Year


This is my first finish of the year. It was started way back in 2012, as a leader/ender project. The top was finished about a year ago, and then it sat and waited to be quilted.  I finished the quilting a couple of weeks ago, and then it patiently sat, yet again, and waited for its binding. I finished the binding on Monday. I have decided to name this one Four Square. I had a lot of fun with the quilting. I saw a pantograph that was done with a version of these shapes, and thought that I could probably do something similar to it, but free hand, using the squares as a guide for size and direction. I had to work it out on graph paper first, and kept the drawing as a guide for which direction to go.
I did the binding, as usual, with a diagonal striped fabric, and a faux piped technique. I love the look and the little bit of colour that piping gives. The fact that the piping also acts as a guide for machine sewing in the ditch to finish the binding is a wonderful bonus. I know lots of people who really enjoy the process of hand sewing their bindings, but that has always been the part of making a quilt that I've liked the least. So this is my go-to binding technique. There's a tutorial here if you are interested in trying it.
I pieced the backing out of some light green fabrics that have lived in my stash for quite some time. I'm liking the look of pieced backings more and more as time goes by. It also does wonderful things for the stash report. Rather than buying new yardage for a backing, I can use what I've got. The challenge is to come up with a combination that looks like it all works together.
The final size of this quilt is 72x88. It used up a ton of my scrap 2 1/2 inch squares. However the box of those is no where even close to empty, so it's time to start thinking of another project for them. I have one in mind, but it will involve some cutting of yardage for the constant fabric background, so it's going to have to continue to knock around in my head for a while yet. I'm linking this up to a couple of finish parties: Sarah's at Can I get a Whoop whoop and finish it Friday over at Crazy Mom Quilts.

Friday, 12 September 2014

A Finish..... finally

Wow, what is my world coming to? Two posts in one day, and I think maybe a post every day for the past week or so........ not bad, not bad at all. The weather finally cleared up enough for me to be able to get outside and get some pictures. I have been working on this quilt for so long, since May of 2013, according to past records here on the blog, that it feels rather strange to be no longer working on it. Her she is, in all her glory...... announcing....... Meteor Shower!!!

 Here's a closer look at all the fun colours in the center of the quilt. I had so much fun playing with all of these bright colours. It's such a sunny happy quilt. Every time I look at it, I smile. As stated many time before, the credit for the design of this quilt goes to Judy Martin. The pattern for this is found in her book Scraps. I think the instant love I felt for this quilt was in large part due to the colours, so I followed the colours she used fairly closely.
Here's one of the corners. The quilting design shows up really well in this shot. I used a very simple, open and flowing star in star pantograph. I didn't want any competition between the quilting and the piecing.
And lastly, a close up of one of the corners, showing my favourite diagonally striped faux piped totally machine sewn binding. I'm running low on those diagonal stripes. It might be getting to be time to do some shopping for some more.
I am linking up this celebration of a finish to Crazy Mom Quilts Finish it Friday

Friday, 24 January 2014

First finish of the year

 My Lazy Sunday Mystery quilt, designed by Bonnie Hunter and presented in 4 issues of Quiltmaker last spring and summer, is finished. Is it ever hard to get decent indoor pictures at this time of year. And at -13 C, there is no way I'm attempting outdoor photos, especially with the way the wind and the snow are blowing around out there. I'd be chasing the quilt around the neighbourhood if I tried it. The only place in the house that is big enough and light enough, is the front hallway. So I asked Matt if he minded if I came and borrowed his floor for a minute or two, which he was fine with, of course. Even then, it was a close fit.


It's kinda hard to see the detail of the quilting, but it's an over all free hand swirl. Lots of fun to do, and lots of texture on the surface of the quilt. It's such a scrappy and busy quilt that anything else would have gotten lost on it.


I added a 2 inch scrappy green border around the
quilt. I wanted to be able to do the faux piped
binding technique on the quilt, and without the
green border, all of the points of the pieced
borders would have gotten chopped off. After all the work on all that piecing, there's no way I wanted to lose all those points. Again, this isn't a very good picture, but if you click on it, you should be able to see the striped binding with the pink insert for the piping.
I'm linking up to Crazy Mom Quilts Finish it Friday, in order to celebrate this finish.

Friday, 9 August 2013

Friday finishes..

 This is the first time in months that I have been able to do a Friday finish post. That's because it's the first time in months that I've actually finished anything. I've started lots of things, but not finished. I'd forgotten the way a finish feels so good.  And not only did I finish one quilt, but two!! I can definitely give myself a whoop whoop!
The first one here is my Scrappy Dresden Plate. This first picture gives the over all look of the quilt, but doesn't really show the quilting that much.

 This one, to the left here, shows the quilting a bit better.
 Here's the back, showing some of the fun feathers that are in all the white background areas and the borders, and also the design that went into the plates themselves. Have I mentioned lately that I love feathers on quilts, and love doing them?
 And here's a close up of one of the corners, showing the feathers in the background, and the fun striped binding, with the faux piping, which is my go to binding for all my projects. It's fast, and easy, and completely machine finished.
 And doing the binding on the Dresden Plate is the reason I finally got this next one finished. It's a Disappearing Nine Patch, that has been quilted and waiting for its binding for months. And the binding was even made months ago, just never put onto it. I figured that, since I already had the walking foot on my machine, it was the perfect time to get this one done. It was quilted with wavy lines going across the diagonal of all the pieces.

And, once again, completely machine bound with a diagonally printed stripe with the faux piping. I'm celebrating these finishes by linking up to Crazy Mom Quilts who hosts a weekly Finish it up Friday, and to Confessions of a Fabric Addict who hosts the weekly Can I Get a Whoop Whoop.

Friday, 10 May 2013

Endless Chain is finished

It's finished!! After checking back on earlier posts about this quilt - one of the many bonuses about blogging is being able to track progress on different projects - I discovered that I started this quilt in March of 2010, so it's been over 3 years in the making. This is a pattern that I originally saw on the front cover of a book by Emilie Richards, called Endless Chain. A number of years ago, at least 4 or 5, I found a series of books by Emilie Richards called the Shenandoah Album series,  5 books that follow a group of friends in a small community. Of course, quilts figure strongly in the books. If you have never read any of her books, I highly recommend them, by the way. All the books in the series are named after quilts, and when I saw the picture of this quilt on the cover,

I fell immediately in love with it, and sent away for the companion book to the novel that had the instructions for this quilt.  In the original quilt on the cover of the book, the coloured wedges were done with a striped fabric. I decided to make my own stripes, and string pieced all the wedges. I think this is one of the most challenging quilts I have ever made. The block units are all hexagons, so there were lots of set in "Y" seams. But I am so glad I persevered with it and got it done. This one is going to live on our bed.
I decided to keep going with the stripes theme on the backing, and pulled all the striped fat quarters I had for the backing. And them I used a diagonally printed stripe for the binding. All in all, a wonderfully satisfying feeling to have it done. And to make it better, I think this is my first finish for this year. I'll be linking up to Finish it up Friday and Can I get a Whoop Whoop for the first, but hopefully not the last time this year.


Friday, 12 October 2012

Shakespeare is done

I have no idea why it took me this long to get this quilt finished. Looking back, I started sewing on this quilt in July of 2010 and finished the quilting back in August of 2011, and then it sat, buried under a pile of quilts sitting on a chair in our dining room, waiting for the binding to go on. Well, it is now on, and totally finished.
This is another Judy Martin pattern, from her book The Creative Pattern Book. I love the movement in the quilt. I love the way the dark background shines through the gold stars.
I used spiraling feathers that follow the movement of the snails trails blocks, and the feathers also reach into the outer background areas of the large stars. The star points and interiors are quilted with continuous curves.
And, as usual, I used the faux piping technique to completely machine sew the binding. The binding fabric was a stripe printed on the diagonal that I found a year or two ago, bought expressly for binding this quilt. I'm linking this finish up to Amylouwhosews, who's having a virtual sewing sewing summit party this weekend. Unfortunately, I'm working this weekend, so can't participate, but she's also invited Friday finishes, so I can do that. I'm also linking up to Finish it up Friday over at Crazy Mom Quilts.

Friday, 5 October 2012

Heartland Star is finished!!


I've continued today, working along with Judy and some others on day 2 in the October virtual quilt-a-thon, and I accomplished my goals. WOOHOO!!
Here she is in all her finished goodness, bound, labelled and hanging sleeved. It feels so very very good to have her completely finished. She is from a pattern designed by Judy Martin, in her book Patchwork Among Friends. Have you ever had a book where you want to make almost all the quilts in it? This is one of those for me. This is the first quilt I've done from this book. It won't be the last. There is an Autumn leaves one that is loudly calling my name.
I used the faux piping binding technique to completely machine finish the binding. I know some people love doing the binding, and putting in the last stitches by hand into it. It is their favourite part. Not so for me. By the time I get to doing the binding of a quilt, I am so very ready to have it done, that the time it takes to hand stitch the binding drives me crazy. So, I used the fabric of the wide border for the binding, and the darker green of the inner border for the piping. I like the little added spark that little bit of accent gives the finished quilt.
Here's a close up of the center of the quilt. I love the colours in the center of this star. I bought these fabrics on a shopping trip with my blog friend Jannette. It was the first time we had met in person, and it was such a fun day. This quilt will always remind me of that day and our first meeting.
And here's another view of all those feathers in the background, along with the smaller stars. I LOVE THIS QUILT! I fell in love with the pattern when I saw it in the book, and it turned out exactly as I dreamed it would.
I'm linking this post up to Amandajean's Finish it up Friday and also to Sarah's Can I get a whoop whoop

Thursday, 23 August 2012

Success........ UFO for August is done


My goal for yesterday was finished, with the exception of one pillow case. And that pillow case is all cut out, and pinned and ready to sew. Another hour should finish it.
It's not a very good picture, with part of it in the sun, and it gives a good idea of how the whole thing works.
Here's a closer view of the side setting triangles. I tried hooked feathers for the first time on this one. And I did the faux piped binding by machine again.
Here's the backing. You can see some of the continuous curves done in the blocks here.
And finally, the pillow case. It goes with this quilt, quite well,  but I think it will go well with other quilts in my collection, as well.
And now, does anyone have an idea for a name for this thing. Right now, it is called Spring Swap because the star blocks in the quilt are from an online swap I participated in back in 2010, hosted by Shannon at Pieceful Kwilter. I would like something a bit more imaginative, but I have a terrible time coming up with names for quilts.
Edit: after much thought, and a suggestion from Gail which focused my brain on the flying geese in the quilt, I've decided to name this quilt Spring Migration. I think it fits with the flying geese in the quilt blocks, and with the fact that the star blocks "migrated" from all over the United States, and even one from Australia. I'm linking this post up to Can I get a Whoop Whoop at the blog Confessions of a Fabric Addict and to TGIFF at Amy's Crafty Shenanigans and to the August UFO reveal at Patchwork Times.


Wednesday, 27 June 2012

Rose Log Cabin is finished....... Woohoo!!!

 I finally have a finish, and it feels soooooooo good. Rose Log Cabin, designed by Deloa Jones, started, according to this blog in July of 2011. It is now on my bed, because this one is staying right here.
Here's a close up of the center section. I quilted leaf shapes into the dark green areas, and petal shapes into the reds. The beige backgrounds are filled with fern type leaves, and the dark green geese shapes and squares have continuous curves.
I decided to keep the design simple, and put the fern type leaves and curls into the light green background areas as well.
And I also managed to get the matching pillow cases done. I used the fabric from the backing for the main body of the pillow case, the green as the contrast colour, and red as the cuff.
And here's the binding, done with the mock piping technique, again using the red, with the same fabric as the backing and the pillow case for the piping. So, that is 3 out of 5 goals that I set for this week done. Once more...... Woohoo!!!

I'm linking this post up to Amylouwho's Sew and Tell and to Sarah's Can I get a Whoop Whoop?, because I am definitely whoop whooping. I'm also linking to a new Friday linky that I found, hosted by Elizabeth at Pieceful life called Show off Friday

Saturday, 31 March 2012

March UFO report


 My March UFO was my Double Duty quilt, a pattern from Miss Rosie's Quilt Company. I had started out doing this as a cross hatch in the log cabin squares. I had the top left hand corner done, stood back and looked at it, and didn't like it, at all. So I ripped out the vertical stitches, and just left in the horizontal straight lines. That I was happy with. I took the last stitches in the binding at 2:10 this afternoon, and took the pictures at 2:25 this afternoon. Considering I had to be at work by 3:00, that was cutting it a bit close. I still have the thread ends of the starts and stops to tie off and sew in, but that is something that I can do while travelling in the car later this month when going up to see Noel and Laurie and Avery again.

Here's a close up of the center of the quilt.

And a closer look at the design in the flying geese portion.
And the backing. 


So far in this year's UFO challenge, I've managed to meet each month's goal. I'm linking up to Judy's UFO Challenge Linky. She's pulled the number 10 for April, which is my Rose Log Cabin. It needs quilting and binding. That should be do-able, I hope. I'm also linking up to Crazy Mom's Quilts finish it friday and Amylouwho's Sew and Tell

Tuesday, 20 March 2012

Out on the clothes line


It was such a lovely day here. Just like a perfect warm, but not too hot or muggy, summer day. I took advantage of it to wash up the winter quilts, and hang them out on the line to dry. They always smell so good afterwards. These are all quilts that I did before I started blogging, but after I started long arm quilting, so I thought I'd take pictures of them and show them.
This one started as a Churn Dash quilt, using 5 inch squares. There were supposed to be an awful lot of them, and I ran out of steam, and got tired of doing them. While browsing through the Quilters Cache website, I came across the block she calls Flies in the Barn. This was one of the first 5 or 6 quilts I did on the long arm, so I'm not going to show any of the quilting. I learned a LOT doing this one. I did a different block inset design in each of the squares, just to try them out, and learn how they worked.


I  totally LOVE the pattern Storm at Sea, and made this one 6 years ago. It is one of the few quilts I have ever put a label, or a hanging sleeve on. This quilt was actually our very low tech solution to a very drafty front door that badly needs to be replaced. Not even weather stripping would help it. So my husband came up with the idea to hang this quilt over the door, with a curtain rod placed up near the ceiling. We were able to pull the quilt completely over the front door, and block all the drafts. It looked pretty too. He's so smart.


This is the back of the Storm at Sea which shows the quilting........... the beginning of my obsession with feathers. I think this is the first one I was truly happy with, and I took it around to various quilts shops in the area when I was first letting them know I was in business, and looking for customers.


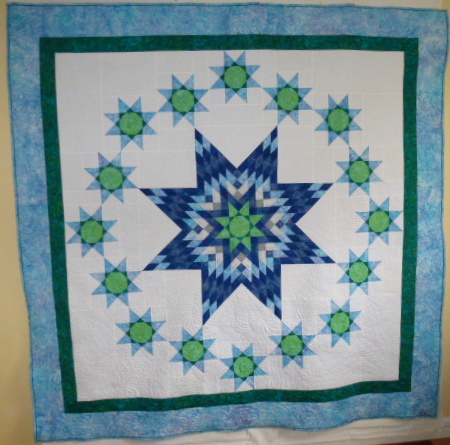
This is my version of Bonnie Hunter's My Blue Heaven. I think it was the first time I did an all over pattern in the center of a quilt, and then something different in the borders. This was also one I did while I was learning, before I took in any customer quilts. I was, and still am, happy with the way it turned out. There are baptist fans in the center, and a fun kind of swirly design in the flying geese and the borders around the geese. I actually put on these borders just so I could do that quilting design.

So, between doing all the laundry, and hanging it out, and working on a quilt, that's how I spent my day. And in between, I enjoyed the warm breezes and tried very hard to ignore all the weeds in the gardens. LOL!! All in all, a good day.


Friday, 2 March 2012

Make Your Point is finished

I took this quilt off the machine Wednesday, at about 6 pm, and started to set it aside to be bound at some later date, since I have another quilt also waiting for binding that I had on my to-do list for this week. But then I started thinking (always a dangerous thing to do, LOL), that it really didn't matter which quilt I bound, and wouldn't it be a good idea to get into the habit of, whenever possible, bind a quilt as soon as it is quilted, rather than set it aside for some future date.  So, that's what I did, which means that other quilt is still waiting for it's binding. Maybe I'll do it next week, and that way have something else for the Friday finishes link ups. Now there's a plan......... I wonder if I'll stick to it.
 Anyway... the quilt I finished is called Make Your Point. It is a pattern from a book called Scrap Lovers' Quilts, distributed by Leisure Arts. It was designed by a lady named Mabeth Oxenreider. The 16 patches in the body of the quilt, and most of the checkerboard around the outside were pieced over maybe 2 or 3 years as leaders and enders, after I first read of the process on Bonnie Hunters' Quiltville. It is quilted with continuous feathers  alternating with continuous curves from row to row, which really emphasizes the points. In actual piecing, the quilt is made up of 16 patches set side by side with pinwheel blocks. It's the turning of the pinwheels, and the colour placement that make it look as if it is on point. I feel in love with this quilt when I first saw it on the cover of that book, and knew I had to have one. I am thrilled over the moon with the way it turned out. I used a very pretty pink tone on tone for the backing, which shows the quilting quite nicely. And it is bound with a bright pink stripe. I'm linking up to a few Friday finishes sites. Finish it up Friday at Crazy Mom Quilts and  Can I Get a Whoop Whoop at Confessions of a Fabric Addict. There are a couple of other friday finish sites as well, but I have to pop out to do some errands, and have to get this posted. I might do an edit and add them when I get back. 

Thursday, 1 December 2011

Crumbs quilt is finished


 Wow, am I ever on a roll. I have another finish. Of course, it isn't a very big quilt, measuring about 60 x 62, and it is quilted with a very simple overall meander. I figured that, since there is so much going on in the quilt itself, complex quilting wouldn't show. Even with the close up, the quilting is difficult to see. For the backing, I found some leftover pieces that were crying to be used up, and to be put into a quilt so they could be loved. I really like the splash of orange tulips down the middle. I hope Shelby likes it, when she gets it for Christmas. I wonder how I'll know if she does, considering she's our chocolate labrador retriever grand-doggy.     And now, I'm off to work. See ya....

Friday edit: Once again, I'm going to link up to AmandaJean's Crazy Mom's Quilts for her Finish it up Friday. And I just found a new linky party that looks like it has a lot of fun stuff to look at, called the Rock 'n Share Party hosted buy a blog called The Shady Porch. Looks Like I'll be spending some time on her front porch.